Text looks fuzzy, icons appear oversized, or your second monitor just won’t display correctly. The fix usually lies in your monitor screen resolution. Adjusting it sharpens images, expands your workspace, and makes everything easier to read, whether you’re gaming, editing photos, or managing spreadsheets.
The good news is that changing screen resolution takes only a few clicks on both Windows and macOS. But choosing the right setting, avoiding blurry text, and fixing “out of range” errors requires knowing your monitor’s native resolution, cable limits, and GPU capabilities. This guide covers every step, from basic adjustments to multi-monitor setups and DPI scaling tricks, so you can configure your display with confidence.
Access Windows Display Settings
Open Settings with a Keyboard Shortcut
Press Windows + I to launch Settings instantly. Navigate to System, then click Display. This panel controls resolution, scaling, and orientation for every connected screen.
Use the Desktop Context Menu
Right-click any empty area on your desktop. Choose Display settings from the pop-up menu. This shortcut skips the Start menu and jumps straight to display configuration.
Change Resolution in Windows 11 and Windows 10
Select the Recommended Resolution
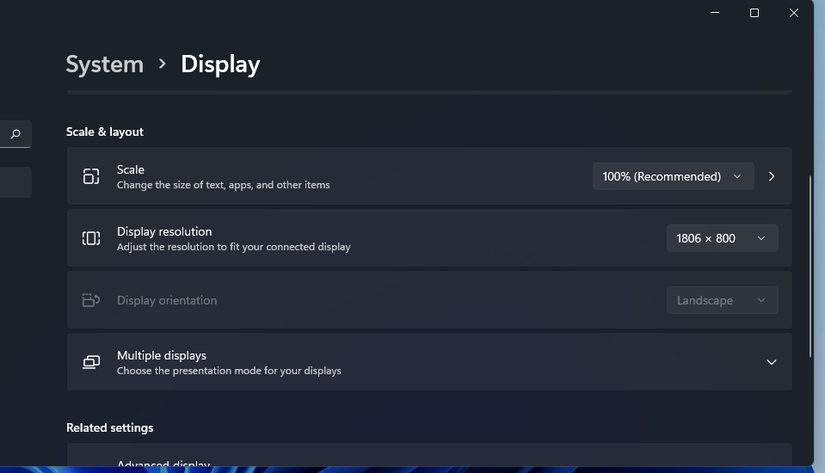
Inside Display settings, scroll to Scale & layout. Click the dropdown under Display resolution and pick the option marked (Recommended). This matches your monitor’s native resolution for the sharpest image quality.
Confirm Before the Timer Expires
After selecting a resolution, Windows asks: “Keep these display settings?” Click Keep changes within 15 seconds. If you wait too long, the system reverts automatically to prevent lockout from bad settings.
Apply Settings to Each Monitor Individually
On multi-monitor systems, click each numbered display icon before adjusting resolution. This guarantees the correct settings apply to the correct screen.
Fix Missing or Grayed-Out Resolution Options
Update Your Graphics Drivers
Outdated drivers often hide resolution options. Open Device Manager (Windows + X then Device Manager), expand Display adapters, right-click your GPU, and select Update driver. You can also download the latest version from NVIDIA, AMD, or Intel directly.
Replace Low-Bandwidth Cables
An old HDMI 1.4 cable cannot handle 4K at 60Hz. Swap it for HDMI 2.0 or higher, or use DisplayPort 1.4 for better bandwidth. USB-C with DisplayPort Alt Mode also supports high-resolution external monitors.
Reinstall the Display Adapter
In Device Manager, right-click your graphics card and choose Uninstall device. Restart your PC and Windows reinstalls the driver automatically. This often restores missing resolution modes.
Adjust Resolution on macOS

Open System Settings
Click the Apple logo in the top-left corner and select System Settings (or System Preferences on older macOS). Choose Displays from the sidebar.
Choose Scaled Resolution Options
By default, macOS shows simplified choices like Default, Larger Text, or More Space. Click Scaled to see more options. Holding the Option key while clicking reveals full pixel-based resolution lists.
Match Retina Display Scaling
On MacBooks and high-DPI Apple displays, macOS scales content automatically to keep text readable. Pick More Space for extra screen real estate or Larger Text for accessibility. Avoid non-native resolutions to prevent blurriness.
Optimize a Multi-Monitor Setup

Connect and Identify Your Screens
Plug in additional monitors using HDMI, DisplayPort, or USB-C. In Display settings, click Identify so numbered labels appear on each screen. This helps you match each display to its icon in software.
Set Individual Resolutions Per Display
Click each monitor icon and set its resolution independently. A 4K monitor should run at 3840×2160, while a secondary 1080p screen runs at 1920×1080. Never assume both displays share the same ideal setting.
Toggle Display Modes Quickly
Press Windows + P to switch between:
– Duplicate (same image on both screens)
– Extend (combine screens into one desktop)
– Second screen only (turn off the laptop display)
Use Extend for multitasking and Duplicate for presentations.
Handle HDMI Splitter Signal Limits

Understand the Single-Signal Constraint
An HDMI splitter sends one signal to multiple monitors. Every connected display shows the same content at the lowest common resolution.
See a Real-World Example
Plug a 4K monitor, a 2K monitor, and a 1080p monitor into one splitter and the output drops to 1920×1080. Higher-end monitors upscale the image, which can look soft or pixelated.
Bypass the Limitation with Separate Outputs
To run different resolutions independently, use multiple GPU ports or dedicated extenders per screen. Splitters cannot deliver unique resolution settings to each display.
Use Graphics Control Panels for Advanced Tweaks
Open the NVIDIA Control Panel
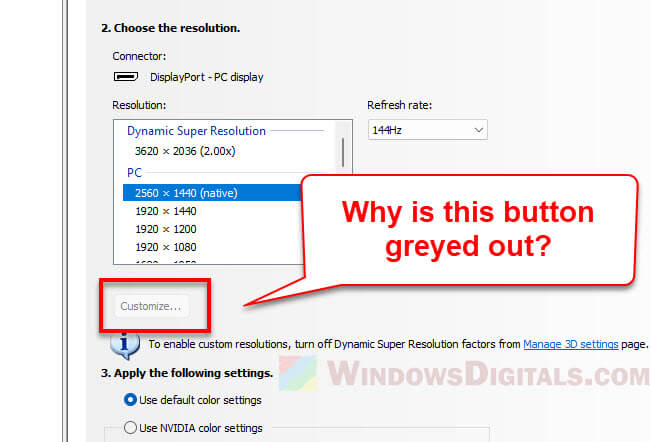
Right-click the desktop and select NVIDIA Control Panel. Under Display, choose Change resolution. Here you can create custom resolutions, set refresh rates beyond OS limits, and assign profiles to specific apps.
Access AMD Radeon Software
Launch AMD Radeon Software and go to Display then Scaling Mode. Adjust settings per monitor, enable super resolutions like Virtual Super Resolution, and fine-tune color output.
Configure Intel Graphics Settings
Search for Intel Graphics Command Center. Navigate to Display then General to change resolution, rotation, and multi-display modes. This works well for integrated graphics users.
Fix Blurry Display Issues
Match the Native Resolution
Blurriness usually means your OS resolution does not match the monitor’s physical pixel grid. Always select the (Recommended) resolution unless accessibility needs require scaling.
Adjust DPI Scaling
In Display settings, change Scale to 125%, 150%, or higher. This enlarges text and apps without lowering resolution, which is ideal for 4K screens where everything looks too small.
Calibrate Text with ClearType
Search for ClearType Text Tuner in Windows and follow the wizard. This sharpens font rendering and works best on your primary monitor.
Resolve “Out of Range” Errors
Boot into Safe Mode
Restart your PC and press F8 or hold Shift during boot to enter Safe Mode. The system defaults to a low resolution, letting you access settings and reduce the output manually.
Reset the Monitor via OSD
Use the physical buttons on your monitor to open the On-Screen Display menu. Select Factory Reset or Auto-Adjust to clear incorrect input settings.
Lower the Refresh Rate
High refresh rates like 144Hz at 4K may exceed cable or monitor limits. In Advanced display settings, drop the refresh rate to 60Hz first, then test higher values.
Manage External Monitor Settings
Check the Monitor Input Source
Make sure the external display is set to the correct input (HDMI 1, HDMI 2, DP, and so on) using its OSD buttons. A black screen often means the wrong input is selected.
Test with Another Device
Connect the monitor to a different laptop or PC. If resolution issues persist, the monitor or cable is the problem, not your computer.
Rearrange the Display Layout
In Display settings, drag monitor icons to match their physical placement. This ensures your mouse moves naturally between screens.
Understand Common Resolution Standards

1080p Full HD: 1920×1080
Ideal for general use, office work, and budget gaming. Requires minimal GPU power and works with most cables.
QHD or 2K: 2560×1440
Great for coding, photo editing, and multitasking. Offers 78% more pixels than 1080p without taxing older GPUs.
4K UHD: 3840×2160
Best for video editing, design, and immersive gaming. Needs HDMI 2.0+, DisplayPort, or USB-C for full 60Hz performance.
Legacy: 1024×768
Still used in older systems or dual-monitor dashboards. Avoid unless hardware limits force it.
Balance Performance and Clarity
Gaming: Prioritize Frame Rate
For competitive gaming, 1080p at 144Hz or higher delivers smoother motion than 4K at 60Hz. High frame rates reduce input lag in fast-paced titles.
Creative Work: Maximize Detail
Designers and editors benefit from 4K resolution. More pixels mean better zoom accuracy, finer color control, and larger timeline visibility in video software.
Office Tasks: Optimize Real Estate
Use QHD (2560×1440) for side-by-side windows, spreadsheets, and coding. Sharper than 1080p and less demanding than 4K.
Configure DPI Scaling Correctly
Avoid Mixed Scaling Across Monitors
On multi-monitor setups, do not combine 100% and 200% scaling. Apps may jump between displays incorrectly. Use monitors with similar DPI when possible.
Override App Scaling Behavior
Some apps appear blurry when scaled. Right-click the app shortcut, choose Properties, then Compatibility, then Change high DPI settings. Check Override high DPI scaling and select System (Enhanced).
Use Per-App Scaling in Windows 11
Windows 11 lets individual apps ignore system scaling. Go to Settings, then Accessibility, then Display and adjust Fix apps that appear blurry.
Follow Professional Use Case Tips
Productivity: Dual QHD Monitors
Run two 2560×1440 monitors in Extend mode. Perfect for email, browser, and document windows side-by-side without scrolling.
Cybersecurity: 4K Dashboards
Security analysts use 4K screens to view multiple log feeds, threat maps, and command terminals at once, reducing the need to switch windows.
IT Management: Enforce via GPO
In enterprises, use Group Policy Objects to standardize resolution and scaling across all company devices. This ensures consistency and reduces support tickets.
Know Your Hardware Limits
Cable Bandwidth Matters
- HDMI 1.4: Max 4K at 30Hz
- HDMI 2.0: 4K at 60Hz
- HDMI 2.1: 8K at 60Hz or 4K at 120Hz
- DisplayPort 1.4: 8K at 60Hz with DSC compression
Always match cable specs to your resolution goal.
GPU Output Capabilities
Check your graphics card specs to learn how many displays it can drive, the maximum resolution per port, and whether it supports daisy-chaining via DisplayPort MST. Exceeding these limits causes black screens or failed detection.
Prevent Common Mistakes
Do Not Force Unsupported Resolutions
Using third-party tools to push beyond native resolution can cause permanent screen damage or void your warranty. Stick to OS-approved settings.
Avoid VGA for High Resolutions
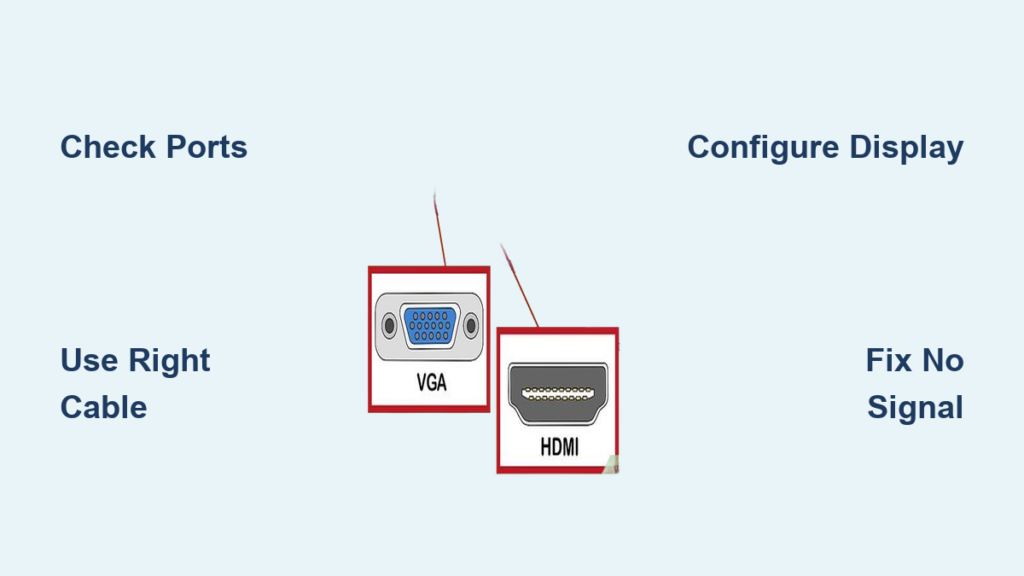
VGA is analog and limited to roughly 1920×1200. For 1080p or higher clarity, use digital connections like HDMI, DisplayPort, or USB-C.
Do Not Ignore Driver Updates
New drivers add support for modern resolutions and fix scaling bugs. Set monthly reminders to check NVIDIA, AMD, or Intel websites.
Frequently Asked Questions About Changing Monitor Screen Resolution
What is the best resolution for my monitor?
Always choose the option marked (Recommended) in your display settings. This matches your monitor’s native resolution and delivers the sharpest image quality.
Why are some resolution options grayed out?
Grayed-out options usually mean your cable, GPU, or driver cannot support that resolution. Update your graphics driver, swap to a higher-bandwidth cable, or check your GPU’s maximum output specs.
How do I fix blurry text after changing resolution?
Set your display back to its native (Recommended) resolution. If text still looks fuzzy, adjust DPI scaling to 125% or 150%, or run the ClearType Text Tuner to recalibrate font rendering.
Can I use different resolutions on two monitors?
Yes, as long as each monitor connects to a separate GPU output. HDMI splitters force all screens to share one resolution, so use distinct ports for independent settings.
Will changing screen resolution damage my monitor?
No. Adjusting resolution through your operating system is safe and reversible. Forcing unsupported resolutions through third-party overclocking tools, however, can damage the panel and may void your warranty.
How do I reset resolution if my screen shows “Out of Range”?
Boot into Safe Mode by holding Shift during restart. Windows defaults to a low resolution, letting you open Display settings and choose a supported option.
Key Takeaways for Changing Your Monitor Screen Resolution
Changing monitor screen resolution is one of the fastest ways to improve clarity and productivity. Start with the (Recommended) setting, which matches your monitor’s native pixel grid. Use DPI scaling to adjust text size without lowering resolution, and always verify that your cable and GPU support your chosen output.
For multi-monitor setups, configure each display individually and avoid HDMI splitters when you need unique resolutions. Keep your graphics drivers updated and match your cable version (HDMI 2.0+, DisplayPort 1.4, or USB-C) to your resolution goal, especially for 4K or high-refresh gaming.
Now open your Display settings, pick the right resolution, and enjoy a sharper, more comfortable screen.